Serenity BDD: infrastructure setup
![]()
Working with any java framework not so difficult as setting up an environment for it. Serenity BDD (Thucidyes) isn’t an exception. In this post I will demonstrate how to setup Serenity BDD project with Maven. It’s obvious that before starting work with something we need to perform some preparations. As a test web-application I’m going to use Evernote.
Introduction
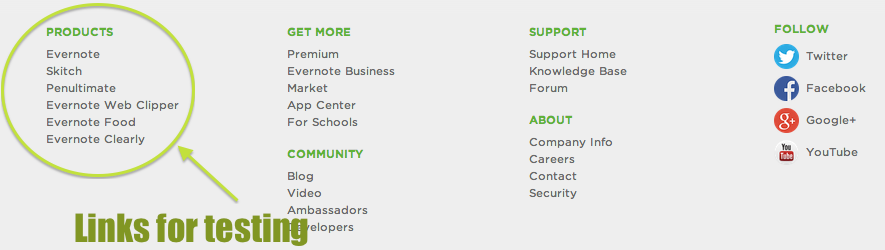
I believe that the best way to teach something, it’s to demonstrate how it works on a real example. That’s why I decided to use Evernote site as a system under test. For sure Evernote will grow in the future, therefore make sense to choose the most stable functionality which won’t be affected by the future changes (probably when you read this tutorial Evernote is updated).
Nothing fits so good for this role as footer links. But don’t pay much attention to the code example, try to understand an entire idea, it will help you to build your own code for the particular website.
Let’s assume that during a sprint planning we received an user story and we need to provide acceptance tests which cover its requirements.
User Story
As Evernote user I want to have ability look on detail information about Evernote Products using footer links: Evernote, Skitch, Penultimate, Evernote Web Clipper, Evernote Food, Evernote Clearly. Each Product page should contain the product name in the page title and in the page header.
This is all what we need in order to start a practical part of the tutorial.
Project setup
Maven makes preparation of any project easier. In order to create a simple Thucydides project I need to use just two dependencies:
...
<dependencies>
<dependency>
	<groupId>net.serenity-bdd</groupId>
	<artifactId>serenity-core</artifactId>
	<version>1.1.21</version>
</dependency>
<dependency>
	<groupId>net.serenity-bdd</groupId>
	<artifactId>serenity-junit</artifactId>
	<version>1.1.21</version>
</dependency>
</dependencies>
...
A folder structure isn’t important for the project. It can be either a part of some web-application project or as a stand alone project. Everything depends on how are you planning to organise your code. This tutorial have following folder structure:
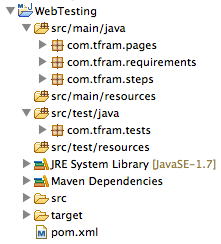
In general the project contains four packages. Each of them serves for a particular task: Requirements, Pages, Steps, Tests. You can read more about these logical Serenity BDD components in the previous article about the Serenity BDD overview.
In the next paragraph I’ll consider Requirements, Pages and Steps entities.
Requirements
In my opinion the first thing which need to be created in any Serenity BDD project is Requirements. There are two reasons for this. First of all it is the most simple part of the test development, because Requirements are the simple empty classes, but with some annotations. The second one reason is that you have to know which functional areas need to be automated. Therefore make sense to create Requirements classes before Test classes.
On a programming level you can make Requirement class by @Feature annotation. Let’s back to the User Story and create the Requirements class for it:
public class StaticPages {

	@Feature
	public class Footer {
		public class ProductSection {};
	}

}
Despite Serenity BDD allows to manage Requirements in a very flexible way, providing three levels for them, I decided to create one class for all static page on the site, then one class for the Footer links and the last one for the links from the Product section.
Pages
What about Pages? It’s time to work on Pages classes, but we have one problem – pages on the site contain many elements and more actions you can do with them. How to define which web-elements and methods need to be placed into the Pages classes?
In order to solve the problem we need to look ahead and to analyse which functionality Tests will check. According the User Story, user need to interact with the Footer links and check page titles and page headers. Hence I need to add into the Pages classes appropriate web-elements and methods.
@DefaultUrl("http://evernote.com")
public class BasePage extends PageObject {

        @FindBy(xpath="//header//h1")
        private WebElement evernoteLogo;

        @FindBy(xpath="//div[@id='content']//h1")
        private WebElement staticPageLabelHeader;

        public void checkPageTitle(String expectedTitle) {
                assertTrue(getTitle().contains(expectedTitle));
        }

        public void clickEvernoteLogo() {
                evernoteLogo.click();
        }

        public void clickFooterLink(String linkText) {
                WebElement link = find(By.xpath("//footer//a[text()='"+linkText+"']"));
                link.click();
        }

        public void checkLabelHeader(String expectedHeader) {
                String actualLabelText = staticPageLabelHeader.getText();
                assertEquals(expectedHeader, actualLabelText);
        }

}
The code snippet above demonstrates how Page class can be formed. I don’t want to stop in details on WebDriver API because it’s out of topic. But I definitely have to provide some information about the Thucydides specific code.
As I mentioned in the first article Thucydides has very elegant annotations, e.g. @DefaultUrl. Each Page class must extend PageObject. I hope that you will find enough information by the links above.
Roughly speaking, all pages of a web application can be broken up using this approach on separate Page classes in order to split the site functionality on many small actions. Then these actions can be used for composing of particular Steps.
Steps
In this paragraph I’m going to develop Steps which later will be used in the Tests development.
public class GlobalSteps extends ScenarioSteps {

	private static final long serialVersionUID = 1L;

	private BasePage basePage() {
		return getPages().currentPageAt(BasePage.class);
	}

	@Step
	public void checkPageTitle(String expectedTitle) {
		basePage().checkPageTitle(expectedTitle);
	}

	@Step
	public void clickOnLogo() {
		basePage().clickEvernoteLogo();
	}

	@Step
	public void clickFooterLink(String linkText) {
		basePage().clickFooterLink(linkText);
	}

	@Step
	public void checkLabelHeader(String expectedHeader) {
		basePage().checkLabelHeader(expectedHeader);
	}

}
Let’s examine the code snippet. The class extends ScenarioSteps and each method which I want to use as a Step is decorated with @Step annotation. The role of the methods annotated with @Step is to be the smallest part of any test. There is one more place where @Step methods appear, it is Reports, but I’ll talk about this in the next article.
Summary
Well seems I have told everything I wanted in this tutorial. Notice that I’m focusing on building of Serenity BDD infrastructure, but not on tests. All code examples can be found on GitHub.
In the next post I will demonstrate how to run Serenity BDD tests.