Spring Boot: Fast MVC start
I planned to write an article about Spring Boot more than a year ago. Finally I have time and inspiration for this. So prepare yourself for 10 – 15 minutes of step by step tutorial. I’m going to demonstrate Spring Boot basics with Gradle and embedded Tomcat. I use Intellij IDEA instead of Eclipse but this shouldn’t be a problem for those of you who used to Eclipse.
Introduction to Spring Boot
What’s my goal? I want to develop something very similar to one of my previous tutorials about Spring with java configurations. It’s a good exercise to compare two different approaches for Spring development.
No doubt, most of you know what is the main aim of the Spring Boot. For the rest of readers I want to say that the Spring Boot makes developers happier because it takes care of configurations meanwhile a developer can focus on a code production. For more details read official reference.
Gradle build file
For managing dependencies and build of the project I use Gradle. Here is how build.gradle file looks:
buildscript {
    repositories {
        //Required repos
        mavenCentral()
        maven { url "http://repo.spring.io/snapshot" }
        maven { url "http://repo.spring.io/milestone" }
    }
    dependencies {
        //Required dependency for spring-boot plugin
        classpath 'org.springframework.boot:spring-boot-gradle-plugin:1.1.2.BUILD-SNAPSHOT'
    }
}

apply plugin: 'java'
apply plugin: 'war'
apply plugin: 'spring-boot'

war {
    baseName = 'companies'
    version =  '0.1'
}

repositories {
    mavenCentral()
    maven { url "http://repo.spring.io/snapshot" }
    maven { url "http://repo.spring.io/milestone" }
}

dependencies {
    compile 'org.springframework.boot:spring-boot-starter-web'
    //Required dependency for JSP
    providedRuntime 'org.apache.tomcat.embed:tomcat-embed-jasper'
}
If you are new to Gradle, I recommend you to read about it somewhere else, e.g. on official site. It’s really nice and practical tool. It can do everything what Maven do, but without XML =)
Spring Boot initialisation
Now we can setup the Spring Boot on a java code level.
package com.companies;

import org.springframework.boot.SpringApplication;
import org.springframework.boot.autoconfigure.EnableAutoConfiguration;
import org.springframework.context.annotation.ComponentScan;
import org.springframework.context.annotation.Configuration;

@Configuration
@ComponentScan
@EnableAutoConfiguration
public class CompanyApplication {

    public static void main(String[] args) {
        SpringApplication.run(CompanyApplication.class, args);
    }

}
That’s it, now you can start develop your business logic. Just kidding, we need to put some extra configs related to view resolving.
package com.companies.config;

import org.springframework.context.annotation.Bean;
import org.springframework.context.annotation.Configuration;
import org.springframework.web.servlet.config.annotation.DefaultServletHandlerConfigurer;
import org.springframework.web.servlet.config.annotation.EnableWebMvc;
import org.springframework.web.servlet.config.annotation.WebMvcConfigurerAdapter;
import org.springframework.web.servlet.view.InternalResourceViewResolver;

@Configuration
@EnableWebMvc
public class WebMvcConfig extends WebMvcConfigurerAdapter{

    @Override
    public void configureDefaultServletHandling(DefaultServletHandlerConfigurer configurer) {
        configurer.enable();
    }

    @Bean
    public InternalResourceViewResolver viewResolver() {
        InternalResourceViewResolver resolver = new InternalResourceViewResolver();
        resolver.setPrefix("WEB-INF/pages/");
        resolver.setSuffix(".jsp");
        return resolver;
    }

}
After you created the class published above, you can go ahead with controller development.
Controller & View
package com.companies.controller;

import org.springframework.stereotype.Controller;
import org.springframework.web.bind.annotation.RequestMapping;
import org.springframework.web.bind.annotation.RequestMethod;
import org.springframework.web.servlet.ModelAndView;

@Controller
public class HelloWorldController {

    @RequestMapping(value = "/hello", method = RequestMethod.GET)
    public ModelAndView hello() {
        ModelAndView mav = new ModelAndView();
        mav.setViewName("hello");

        String str = "Hello World!";
        mav.addObject("message", str);

        return mav;
    }

}
And corresponding view hello.jsp for the controller:
<html>
<head>
    <title>Hello world page</title>
</head>
<body>
    <h1>${message}</h1>
</body>
</html>
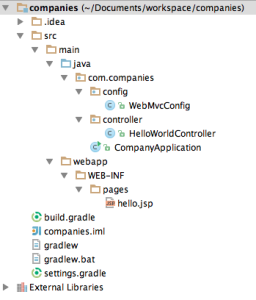
I hope it wan’t hard to repeat all these steps.
Run Spring Boot application
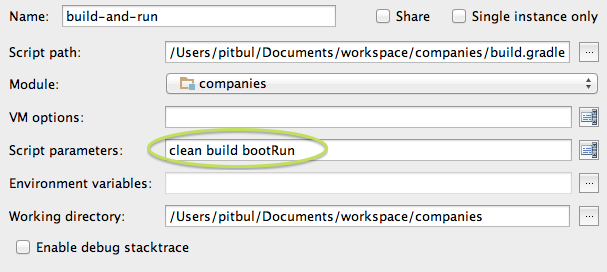
The last thing which we have to do in this tutorial is launch of the application. Hence I use Gradle, and in our build.gradle file I specified that the application need to be package as WAR file – I need to run build and run war file.
Here is how it looks like in IDEA:
Result you can see here localhost:8080/hello
If you want to perform start of the app more simply, just run the CompanyApplication.class
This approach is more preferable compering with the first one.