How To Build & Deploy Scala Application?

Hey! Looks like you are familiar with Scala. And I believe you even develop some apps locally using it. A main mission of the code is to help people to solve their problems. But how your apps can do this, if they are running locally on the laptop? In this post I want to show the easiest way to deploy a Scala application.
How to build Scala project
What do I mean by saying “build” a Scala project? Well, actually it means that the project which runs locally from IDE, should be “transformed” into something, what can be launched from any other environment (Linux / Windows / Mac).
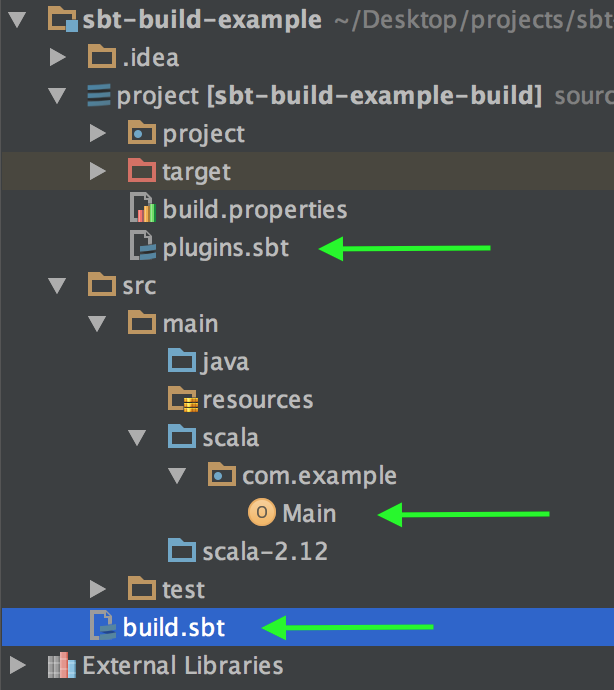
Let’s consider a sample Scala project. It should be something really simple. So I decided to create a trivial akka-http app. Here is its structure:

I used green arrows in order to highlight files which are important in context of this article. By walking through the files, we need to see what they contain and what is a purpose of them. By doing this I want to make a projection from a particular example to more general one.
Almost all Scala projects start from build.sbt file. As a rule it contains meta information about the project: name, version, dependencies…
name := "sbt-build-example"

version := "1.0"

scalaVersion := "2.12.2"

libraryDependencies ++= Seq(
  "com.typesafe.akka" %% "akka-http" % "10.0.9"
)
Take a look at dependencies in the code above, if to be more precise – look at single dependency. For sure your project contains more than one. But for the demonstration it’s enough.
Then we have a Main class where all “business logic” happens:
package com.example

import akka.actor.ActorSystem
import akka.http.scaladsl.Http
import akka.http.scaladsl.Http.ServerBinding
import akka.http.scaladsl.server.Directives._
import akka.stream.ActorMaterializer

import scala.concurrent.Future

object Main extends App {

  implicit val system = ActorSystem()
  implicit val ec = system.dispatcher
  implicit val materializer = ActorMaterializer()

  val routes = pathPrefix("ping") {
    get {
      complete("pong")
    }
  }

  val bindingFuture: Future[ServerBinding] = Http().bindAndHandle(routes, "127.0.0.1", 5000)

}
So the demo app has only one endpoint which returns “pong” when you make a GET request to 127.0.0.1/ping
You can check it if you want.
So how to build this app? How to make it deployable? In order to perform this, we need to add sbt-native-packager plugin to the project. You can do it by adding a single line of code to the plugins.sbt file.
addSbtPlugin("com.typesafe.sbt" % "sbt-native-packager" % "1.2.0")
Then you need to add the following line of code to the build.sbt file as well:
enablePlugins(JavaAppPackaging)
Voila!
Open a terminal / console, navigate to the root folder of the project and execute following command:
sbt stage
This command generates a new folders in your project directory:
target/universal/stage/
There are two folders in the stage directory: bin & lib.
The first one contains launchers (Linux / Mac / Windows). The second one contains all dependencies and a jar with the application classes.
What’s next? As you may guess, the content of the stage directory can be moved to your server and launched there by executing following command in the console:
./bin/app-name
Notice that this command must be run from the stage folder. By the way, app-name may vary depends on a project name (package name) which you specified in the build.sbt file.
Summary
As you see sbt-native-packager gives a pretty straight way to build a Scala project. What is really cool, is that it provides much more packaging options for Scala apps. In this article I described only 5% of functionality which this plugin can perform. Therefore I’m going to write a couple new tutorials about sbt-native-packager.
